Timm's BMW E31, E32, E38 and E39 Trans Fail-safe Prog
Caused by Gearbox Selector Switch failure, causes strange gear changes and unusual gear display (S3)
Affects ZF 5HP24, 5HP30 and 4HP24 Gearboxes (BMW A5S540, A5S560)
I’m happily trundling along in Sports Mode on a country A road when there is a slight thump and the
gearbox dropped down into 3rd gear - and then it changed back up to 4th again. I stuck the shifter
back into D and all seemed Ok, and then I was in 3rd gear again. A quick look at the Instrument
cluster gear display showed:
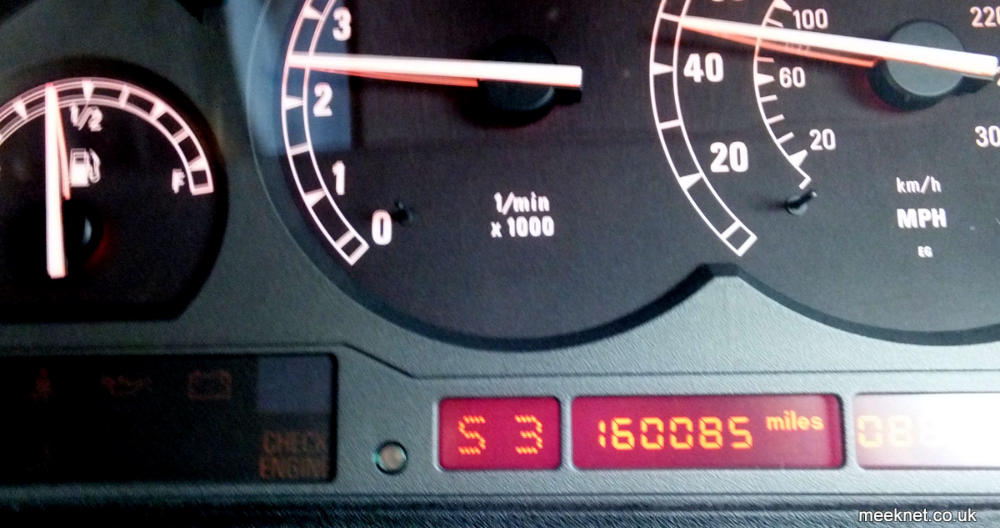
S3 is not a normal display, no matter what you do to the Steptronic shifter, so something has gone wrong with the electronic control of
the gearbox. Going up the A3 in 3rd gear isn’t much fun, especially with the 3.15 diff - I can’t select any other gears, the shifter doesn’t
do anything when pushed to the left or the right - I tried pushing the shifter into neutral and the display went blank. I decided to pull
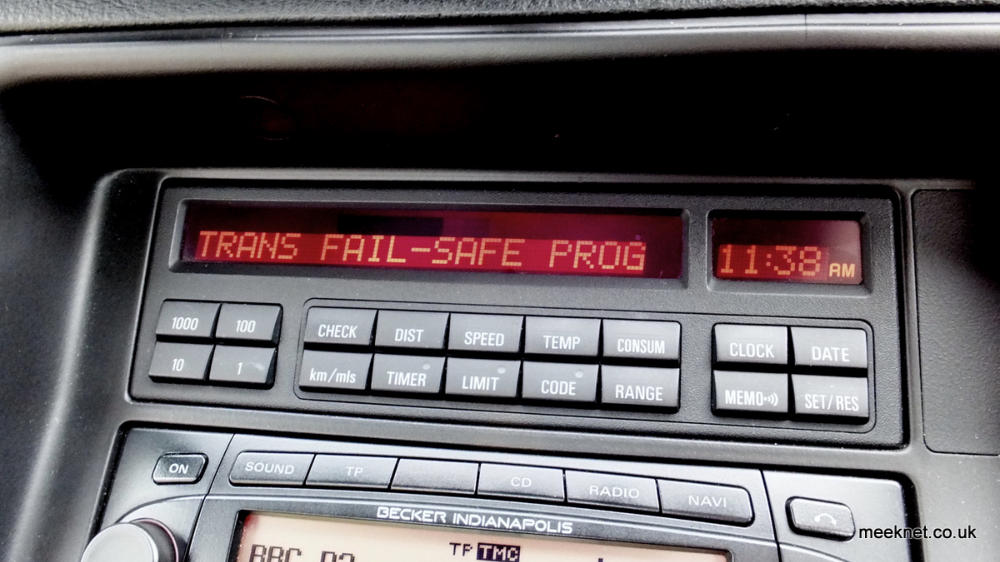
over, switch off and re-start allowing the gearbox to go into:
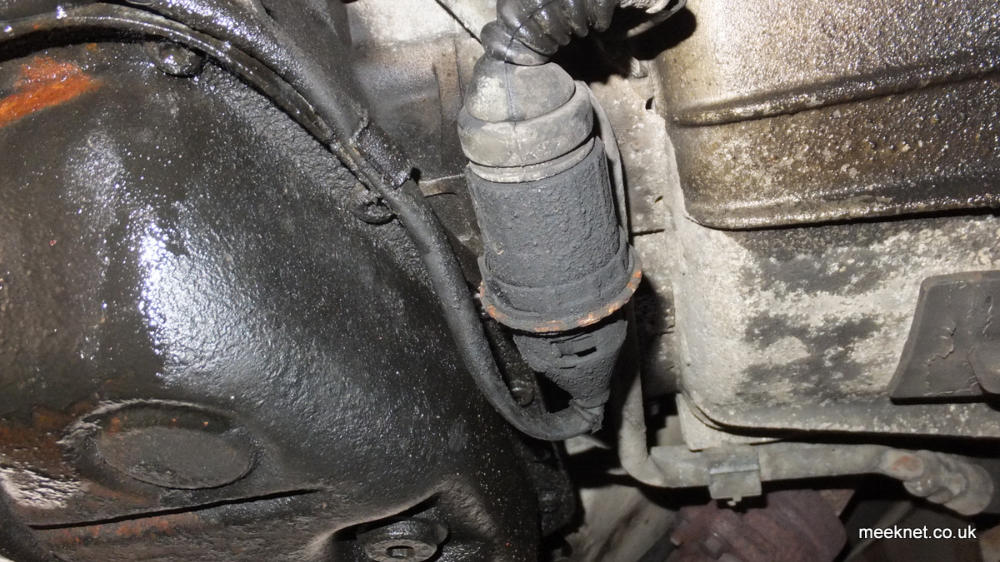
And there is one on the side of the gearbox itself:
Hardly inspiring, but at least this means that the gearbox will go into 4th gear (the default gear when things have gone wrong) and I can
get up the A3 at reasonable revs. Trans Fail-Safe Prog is quite a scary thing to see on the display, you immediately add up the cost of a
replacement gearbox and how you will manage to do the work on a pair of ramps. But, this behaviour is not of a failing gearbox, just the
systems that control it - it is very rare for the ZF gearbox to actually fail mechanically, they are very robust, but the control of it can cause
all sorts of problems. This problem is just one of many that can cause Trans Fail-Safe Prog, but we will look at how it can be fixed.
The cause of this problem is the Gearbox Selector Switch or the EGS (Gearbox ECU)
The ZF gearboxes are both mechanically controlled (via a cable from the gear selector lever) and electronically controlled (via the gearbox
computer) - this dual control is there so if the gearbox computer (EGS) throws a fit the gearbox won’t select reverse while going down the
motorway - and electronics have a predilection to doing that sort of thing.
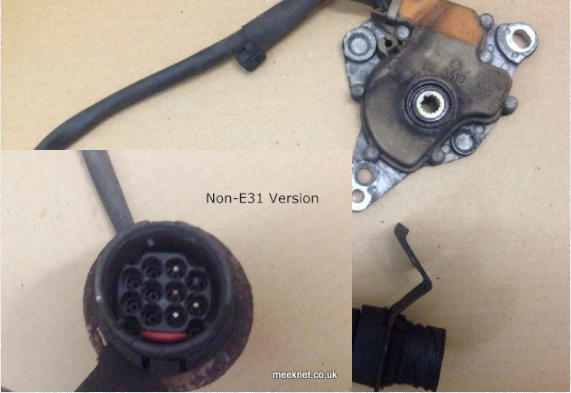
There are two electronic switches that are connected to the Shifter - there is one on the shifter itself:
The switch on the shifter inside the car has no affect on gearbox operation, it is only there to illuminate the correct LED next to the shifter -
and that’s all it does, it can be disconnected and the system will work perfectly without it.
The switch on the side of the gearbox is imperative to the correct operation of the gearbox - and because of that the switch is a real work of
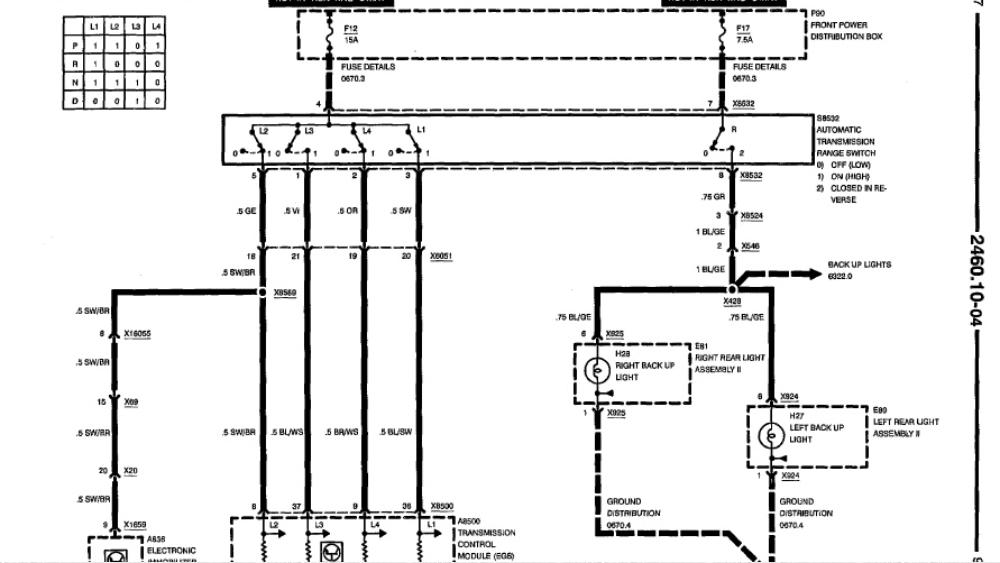
art - a fully sealed device with multi-way switching contacts swimming in a sea of contact oil. The circuit diagram above shows the way the
switch is connected to the EGS via four wires on the E31 (plus two power supplies and the reversing switch output making 7 wires in total) -
on other models the reversing switch is omitted and the switch is a 4-wire version plus one power supply wire making 5 wires in total.
This information is important if you want to replace the switch as there are many versions around - including variations on where the
mounting lugs are. Buying from BMW against your VIN is the safest way, but at around £500 it’s also a bit expensive - but we have ways of
making it work again!
Diagnosing the switch failure
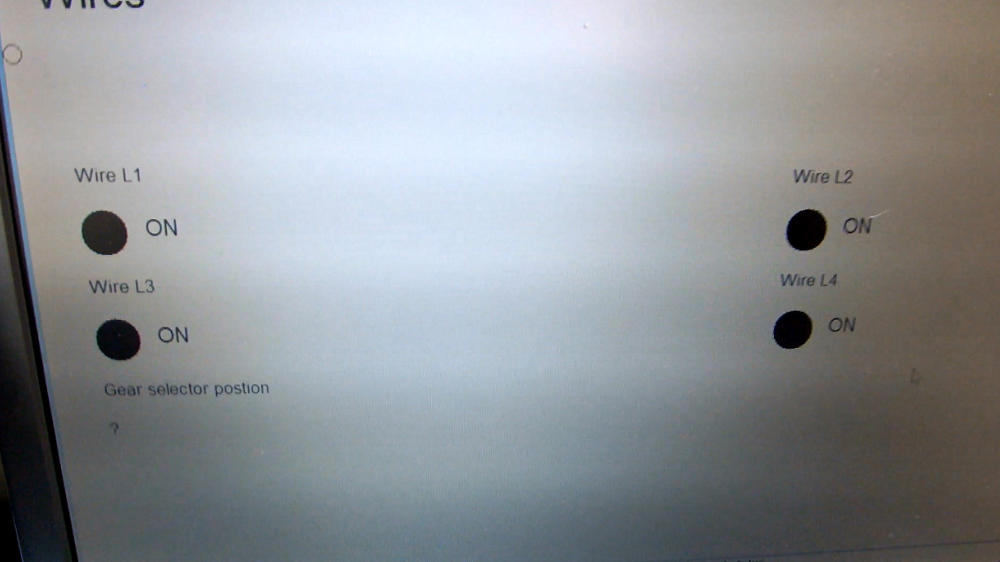
The switch outputs can be monitored using INPA - selecting Live Data and ‘Wires’ - the screen display as seen below shows the outputs from
the switching contacts - I have selected Neutral on the shifter and I should have a switch pattern of L1=ON, L2=ON, L3=ON and L4=OFF
But, as can be seen below, L4=ON and that’s not good at all (the switching patterns are shown in the circuit diagram seen above):
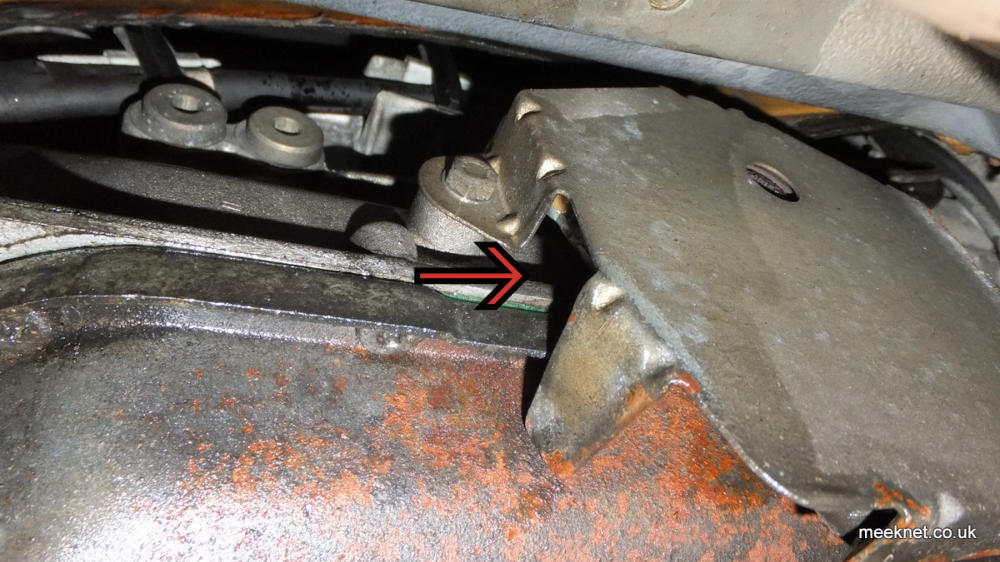
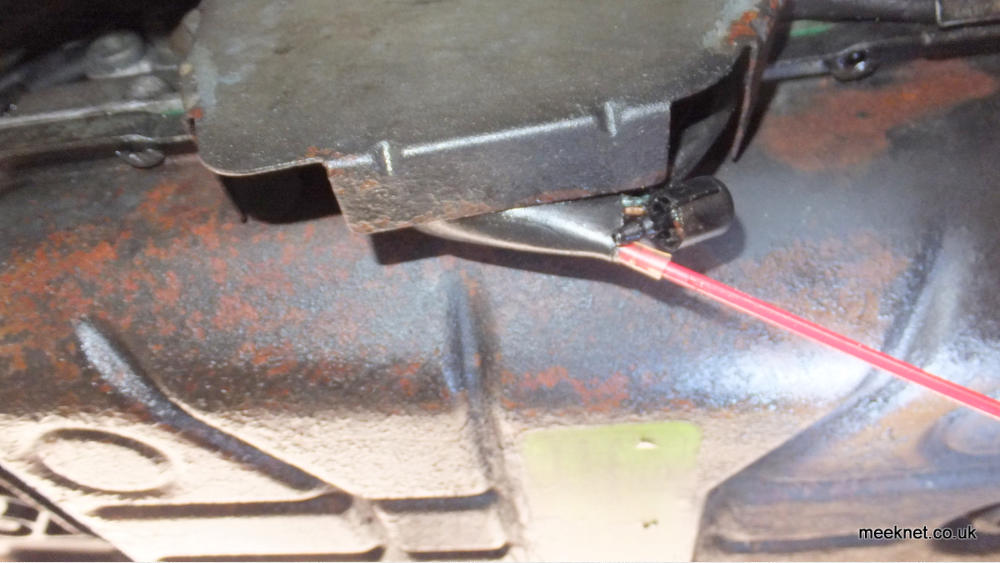
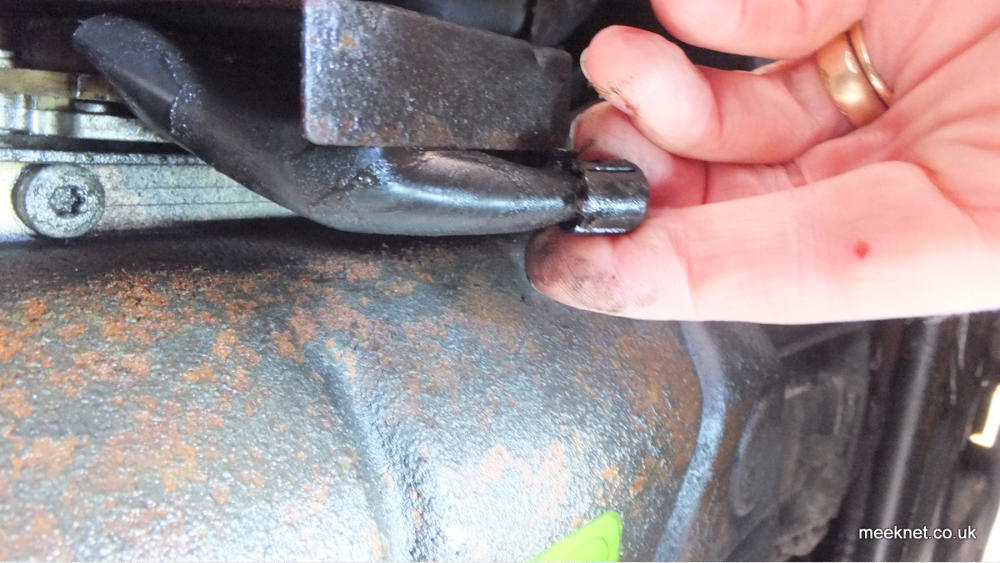
The fault could be in the EGS itself or the wiring, so it is well worth separating the connector pair and checking for corrosion - but, the
connector pair is very well designed and shouldn’t cause any problems - but check the wiring for chafing - here’s where the connector is:
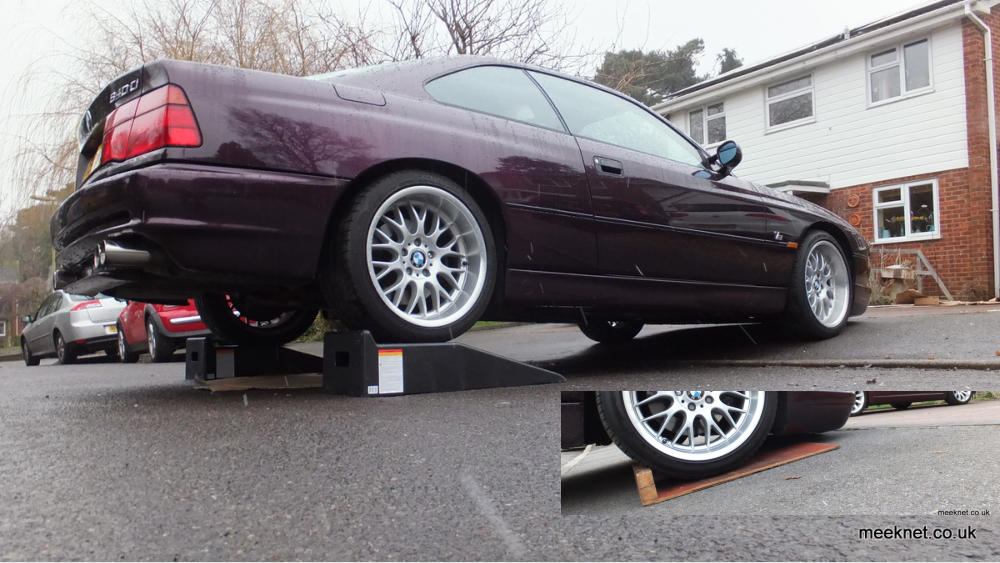
OK, that’s enough talking, it’s time to measure to see if the switch is the problem and repair it. If, like me, you don’t have a lift or a pit you
need to improvise as the switch and connector is right under the centre of the car - I used the kerb to give a bit more height and ramps
behind, the ramps only just fitted under the sides of the bumper and there was just enough room to get under the centre of the car - it
wasn’t very comfortable, and it was snowing just to add a bit of fun:
Well, that’s all rather strange, so I found an aerosol with a straw still fitted, stuck the straw up the pipe and gave it a squirt (of solvent as it
turned out) - and lots went into the switch - a bit of pressure built up and then the pipe blew off the switch - the solvent had distended the
pipe material (and probably did the switch no good at all).
But, this made me think that the switch could be cleared out of old contact material using WD40 - so I tried that and it worked really well.
Sticking the straw back up the pipe and holding it in place as I pressed the button pushed loads of WD40 into the switch, after a while a fine
mist came out of the centre of the switch at high pressure. When I pulled the straw out most of the WD40 came back out along with some
discoloured stuff. This is a good way to clean and lubricate the switch and we will use the same method under the car.

Revealing a pipe that is blocked with a wax-filled plug (the black bit shown above). The plug can be removed and the pipe threaded back
through the sleeving
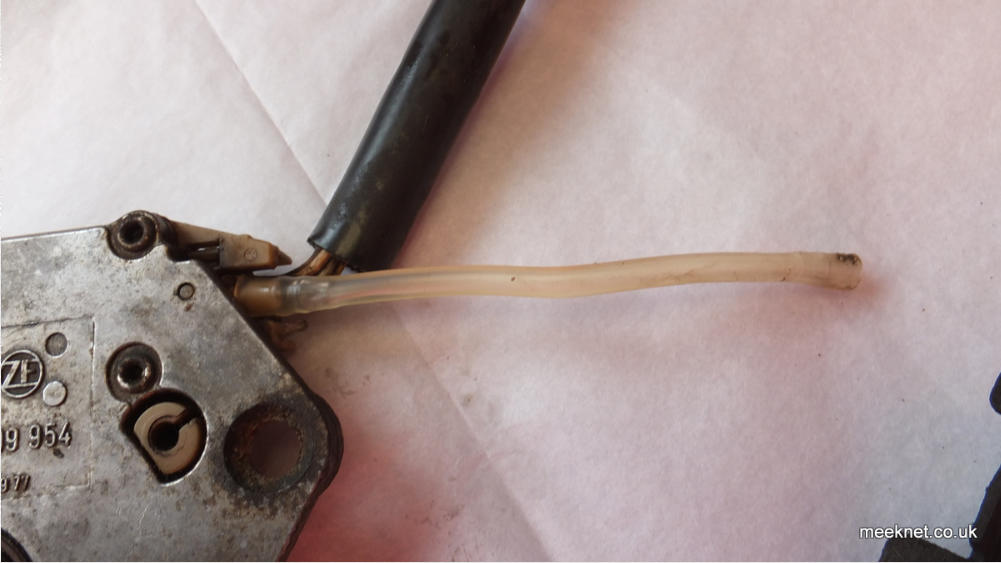
That’s my Ebay switch from a 740i - and there’s a strange cap that blocks a PIPE coming from the switch - so I pulled it apart:

With the car on the ramps you need to leave the gear selector in DRIVE as this opens all but one of the switches.
VERY IMPORTANT: It is imperative that the handbrake is firmly applied and the front wheels chocked - take the key out
I use the device shown above to ensure the car is fully on the ramps and cannot move any further
To measure the switch for internal leakage you will need a multimeter, a cheap one will do fine, especially as you will be dragging it under
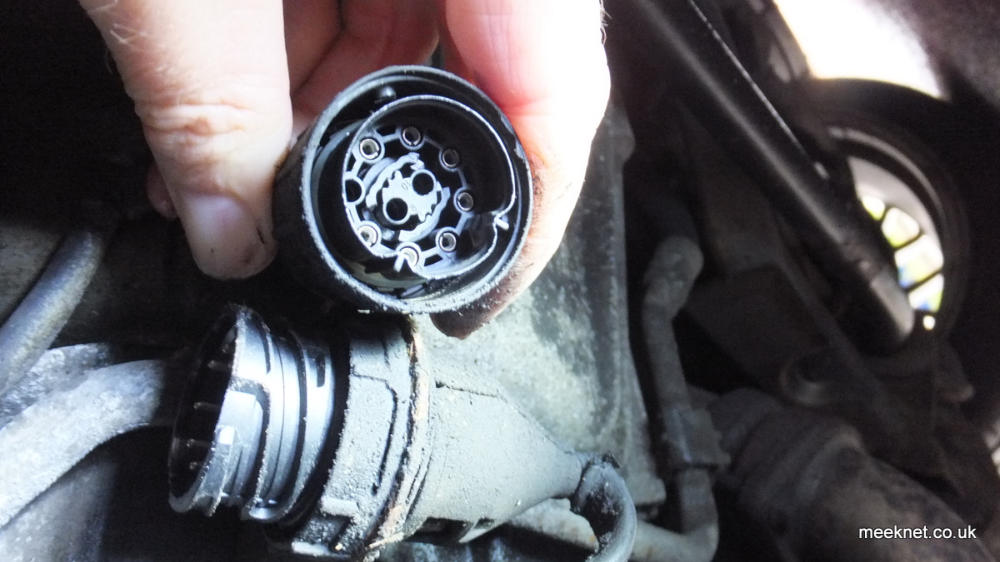
the car. The connector pair shown earlier twists apart and you will get access to the 7 pins that connect to the switch. With the meter set to
Ohms you can measure between the contacts. Apart from one pair of contacts that will measure zero Ohms, a perfect switch will show an
infinite resistance between all other pins,
My switch measured a few thousand Ohms between most of the pins - and that amount of leakage is enough to cause ‘illegal’ switch
patterns and give the strange readout on the Instrument Cluster. If yours is the same there is a way to fix this without changing the switch
- have a look at the pictures below:
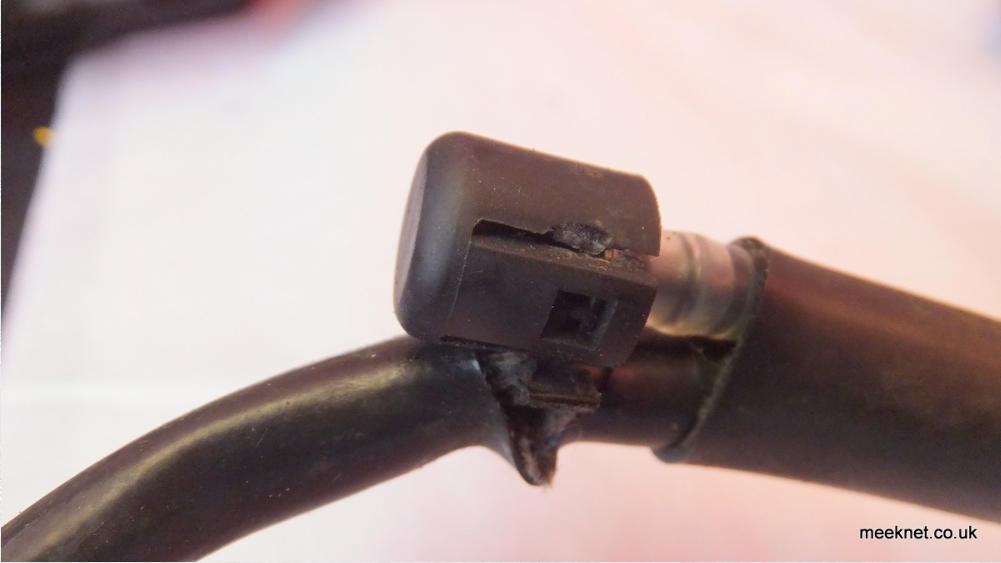
Here we are under the car again and there’s the same cap, plug and pipe as on the Ebay switch - so off with the cap and plug leaving the
end of the pipe ready to squirt WD40 into - let’s face it, this isn’t much fun at all, the WD40 goes everywhere, in the torch, in the meter, up
your arm. But, straw into position
The straw is as far up the pipe as possible and I will be using my other hand to hold the straw in position as I press the button. What you
should find is that when you press the button the WD40 whizzes into the switch for a few seconds and the pressure inside the switch will
build up and a very fine mist will come out of the centre of the switch. Remove the straw and most of the WD40 comes flying back out
again, under quite a bit of pressure.
Stick the straw back in again and repeat the process until the WD40 coming back out of the pipe is clear (well, as clear as WD40 gets).
Finally. puff it back up again, pull the straw back out slowly and pinch the pipe in front of the straw so the pressure is retained and
immediately refit the plug - refit the cover on the pipe plug and you are done - and stinking of WD40
I measured the resistance between pins again (and gave myself a good crick in the neck in the process) and the resistance had increased to
around 500K Ohms or so. I would guess that as the action of the WD40 continues the resistance would eventually increase beyond the
range of the meter.
The result of all this messing around meant that the selector switch was now giving the correct patterns and the Instrument Cluster showed
the correct gear selections - so, all good!
A bit more information on the Gearbox Selector switch
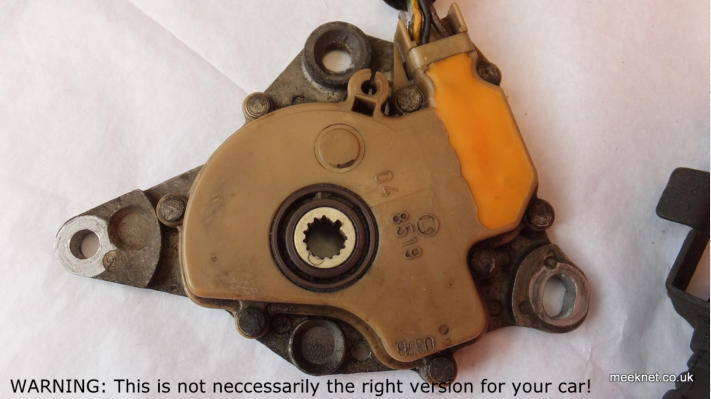
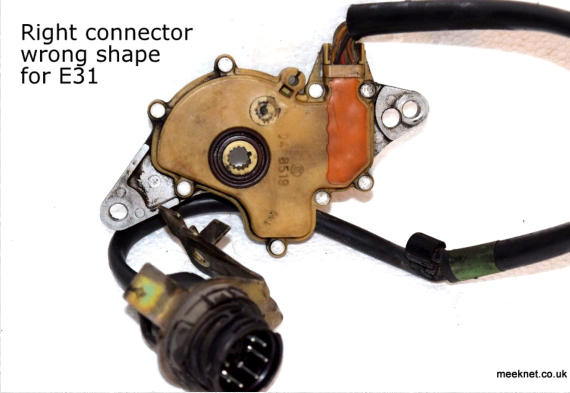
If you cannot repair the selector switch as detailed above then you will need to replace it - the problem is that the E31 version is very rare.
Looking at the Ebay adverts for the switches, many list the compatible models as including the E31, but a close look at the pictures show
that most aren’t. The main differences are that firstly, there are 5-wire versions with a connector that has two rows of pins (not compatible
with the E31) and 7-wire versions with all seven pins around the periphery of the connector. Secondly the mounting holes are in different:
So, if you are buying a switch from Ebay spend a bit of time looking at the pictures, and if there is no picture of the connector ask the seller
to confirm the numbers of pins on the connector.
A bit of information on the connection between the EGS and the selector-position switch
From the circuit diagram earlier in this article it can be seen that the switch outputs are pulled HIGH by a fused 12V supply, they are pulled
LOW by resistors within the EGS. I took the EGS apart and measured the resistors, they are 1k3 Ohms, that gives a current of 10mA
through the switch when closed. That is a rather feeble current, barely enough to self-clean the switching contacts.
This is one of the reasons that the switch requires lubrication to operate reliably. I’m not sure why such a small current is used, possibly to
limit dissipation in the pull-down resistors. As I couldn’t find a suitable replacement switch for the E31 (there are loads of E38 versions
available) I decided to increase the switch current so that the leakage current was less significant by adding extra pull-down resistors of 330
Ohms (1W) on all four switch inputs - giving a total of around 50mA per contact. I did this on a replacement EGS from an E31 - the EGS can
be replaced without any coding, the gear-changes were exactly the same and adaptations did not need to be deleted.
This got everything working again without any fiddling with the switch and got me back on the road again - but the problem with leakage in
switches is that it will get worse unless something is done about it - so it was important that the switch was cleaned and lubricated. The
modification of the EGS is not a DIY job and I have purposely not covered it here.
All done, Time for a Cup Of Tea