

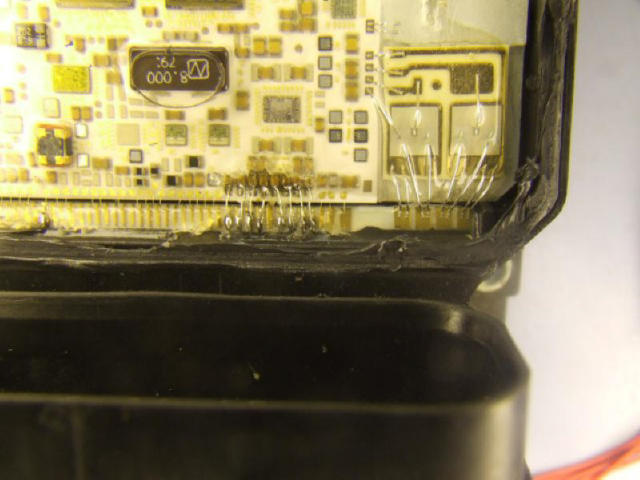
...it isn't, and contains twin processors and
valve-drivers constructed as a hybrid circuit
on a ceramic substrate. This clever stuff lives
under the outer cover and is covered by a
soft compound that can be easily removed.
Repair of this circuit is impossible unless one
of the gold wires has fallen off, and even then
it requires a lot of patience:
If you use CarSoft diagnostics you may get a
'wheel sensor failure' but you will find that
replacement of the wheel sensor makes no
difference.
You really have two choices.....get a 'repair
kit' from BMW (Part number 34526769862 -
£450) which consists of the 'black box' and
when fitted get BMW to recode the ABS
controller to match the car (another £30 -
£50). Or you can get a replacement from FAB
or another breaker (usually £50 upwards and
you get the ABS pump strapped to it).
If you get a replacement from a breaker it is
essential that it comes from the exact year
and model as your car. As long as you can
manage this you will NOT need to have the
unit recoded.
Even if you get the same part-number this
does not mean that it will not need recoding.
The reason for this is that (for instance) a '98
735i uses an ASC actuator whereas a '98
740i doesn't (being fly-by-wire). Both cars
have the same part number on the Bosch
controller. If the 735i controller was fitted to a
740i it will need recoding because the
controller cannot 'find' the missing ASC
actuator.......CarSoft will return an 'ASC valve'
failure.
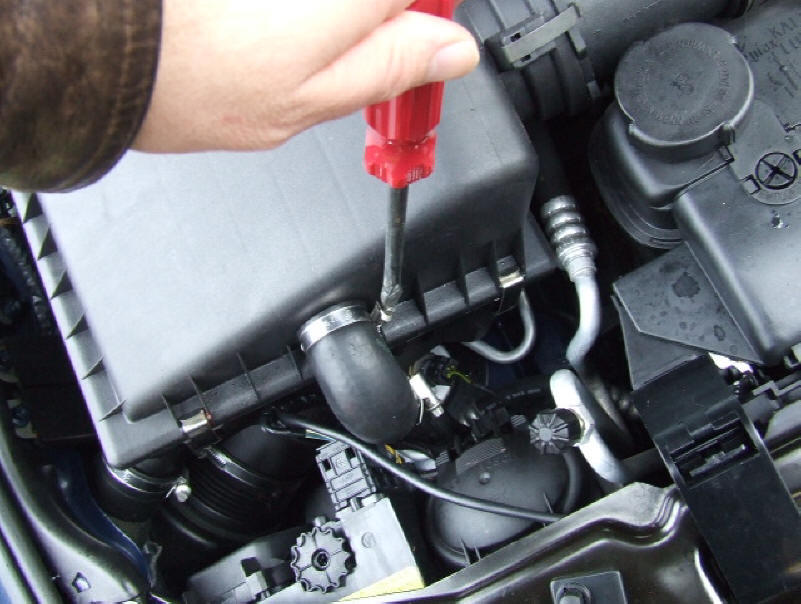
So, enough blurb, this is how to sort it.
Disconnect the battery otherwise you will need
CarSoft to reset any fault codes. Remove the
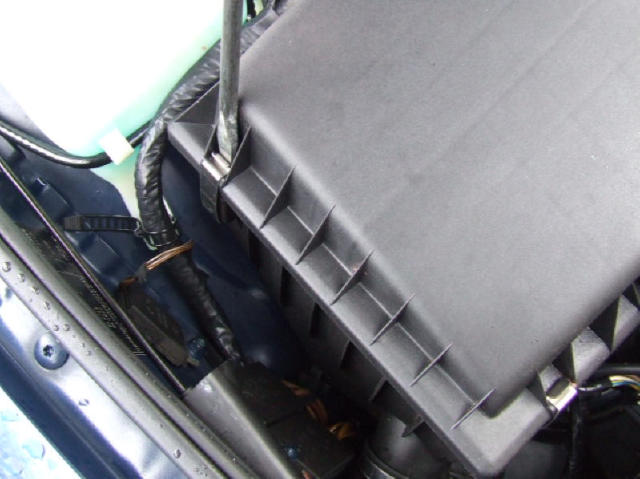
pipe that leads to the airfilter housing:

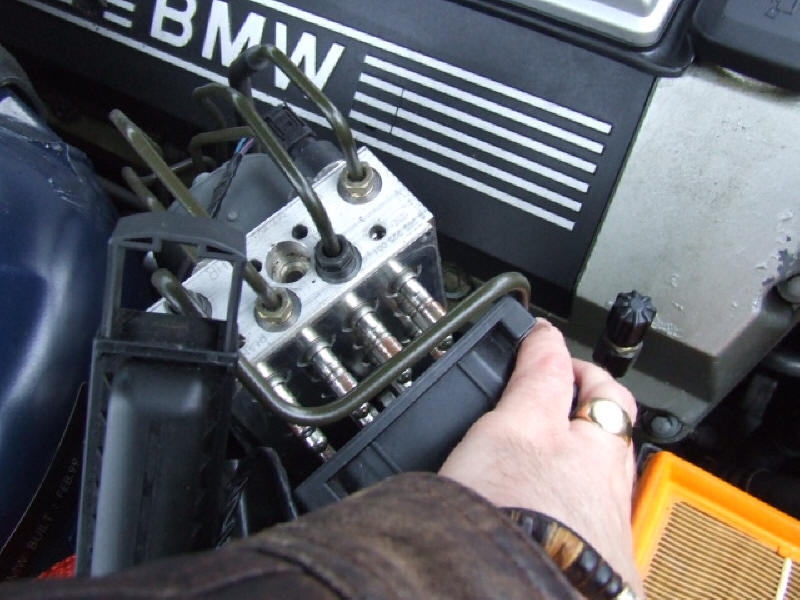
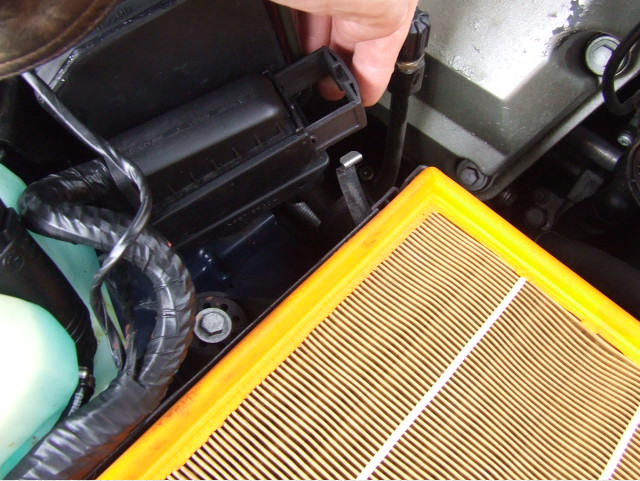
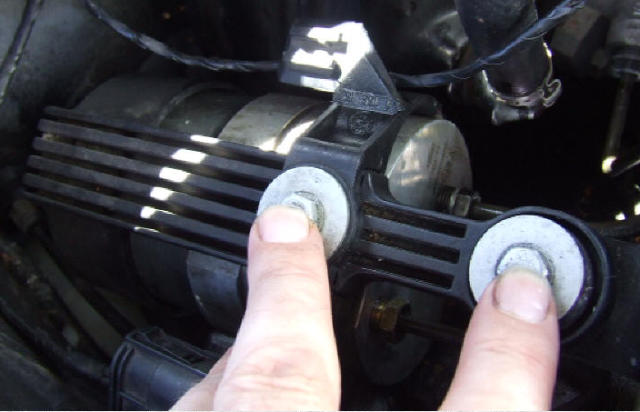
Stick a broad-bladed screwdriver in the end
of the ABS connector and carefully slide out
the connector lock
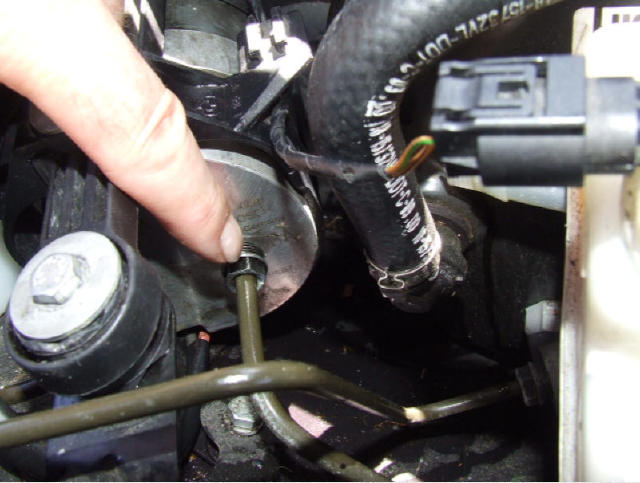
The connector can now be lifted out of the
way. Use a Torx 20 driver to remove the six
Torx bolts that secure the controller to the
ABS pump
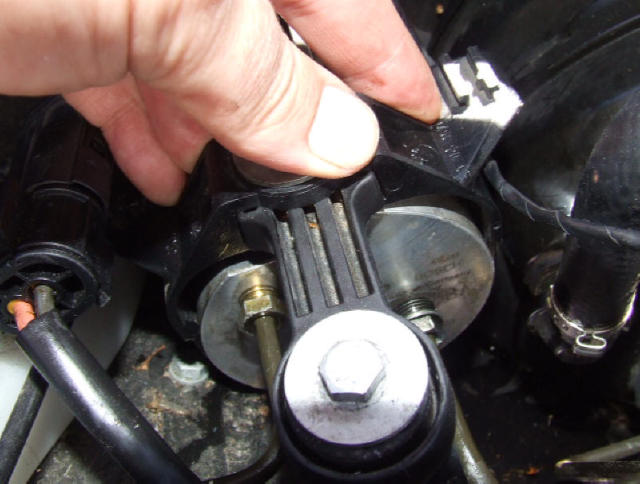
I found it quite easy to get to all six bolts as
my driver was articulated, if you do not have
an articulated driver then remove the lower
part of the filter housing. The bolt marked
above can be removed and a couple of
jubilee clips hold the lower housing to the
large diameter pipework to get easier access.
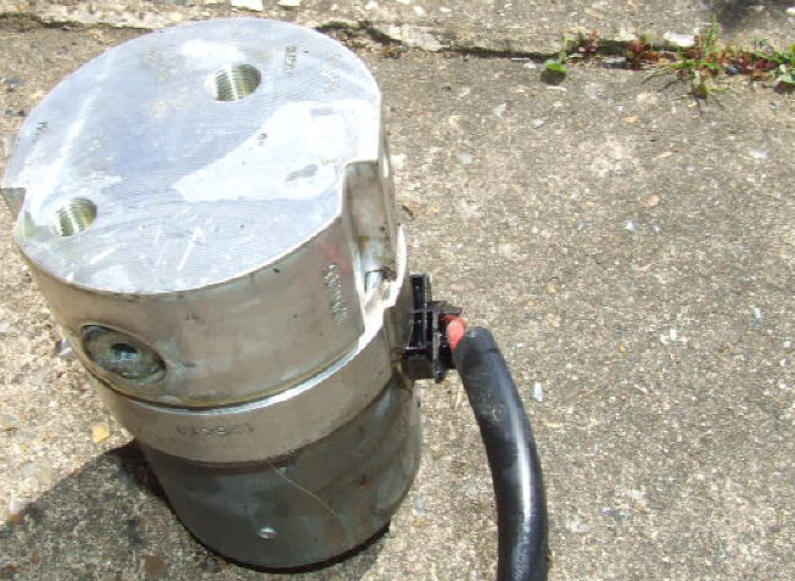
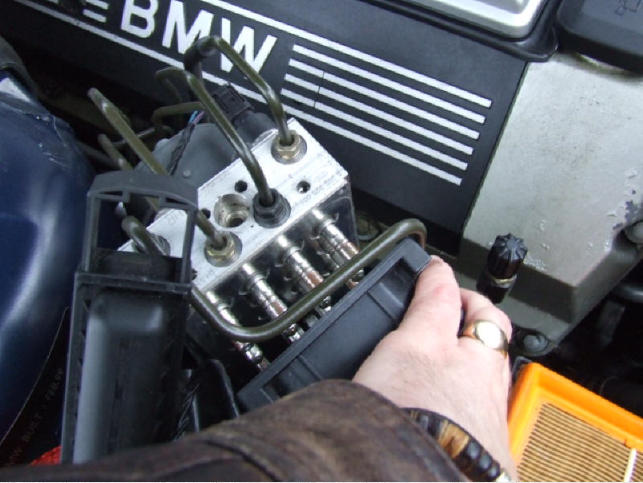
Once all six bolts are removed the controller
can be pulled carefully away from the pump:
...and replacement of the new part is just a
reverse of this process. In the picture above
you can see that one of the brake pipes
slightly interferes with the controller, push this
away from the controller when fitting the new
controller. Do not force the controller in place,
you must align all the coils with the valve
bodies and then allow it to slide into position.
As long as the replacement part came from
the correct car then there should be no fault
lights present. If you do get an ASC warning
then the controller will need recoding by
BMW or someone who has the capabilities
(CarSoft cannot be used to recode).
SECTION 2 - Pre-Charge pump failure
Pre-charge pump failure is suspected when
the lights only come on when the speed hits
around 30MPH, or lower if the car is
accelerated more harshly. This may only
happen rarely, but will get more common as
time goes on. Diagnostics will show 'Error 92
pressure sensor (pre charging pump)'.
The pre-charge pump lives right next to the
brake master cylinder and is used to increase
the available brake fluid pressure which is
used for the DSC system to apply brakes to
individual wheels. The pre-charge pump first
runs under the following conditions:
Speed greater than 30KPH
Engine speed greater than 2000RPM
Engine torque greater than 100NM
This means that if you accelerate very
carefully you can stop the ABS, ASC and
Brake lights illuminating until a higher speed is
reached. This is a good indication (without the
use of diagnostics) to ensure that the pre-
charge pump is the cause of the failure. To be
sure the pump is at fault, you can connect
12V to the in-line connector by disconnecting
the connector pair and applying 12V, positive
to RED and negative to BLACK, with 12V
connected the pump should run. If it just goes
'bonk' (like mine did) it is dead as a Dodo.
Here's how to replace the pump without the
need to bleed the complete system. I normally
take photo's as I do the repair, this time I
couldn't as there was a lot of brake-fluid
around, so I will just point to things after the
repair:
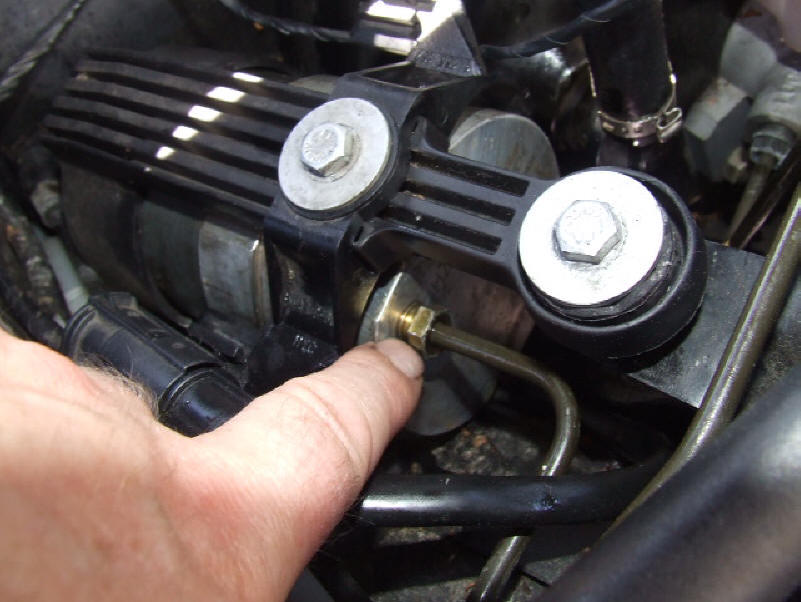
Start by disconnecting the connector pair,
then remove these two long bolts and
washers:


There are two hydraulic pipes running to the
pump, this pipe connects to the fluid
reservoir. Use an 11mm open-ended spanner
and small metal hammer to 'shock' the fitting
loose. Quickly undo the fitting and then raise
the pipe above the reservoir to minimise fluid
loss:
The other fitting is connected to the master
cylinder, remove this using the same method,
not much fluid will be lost:

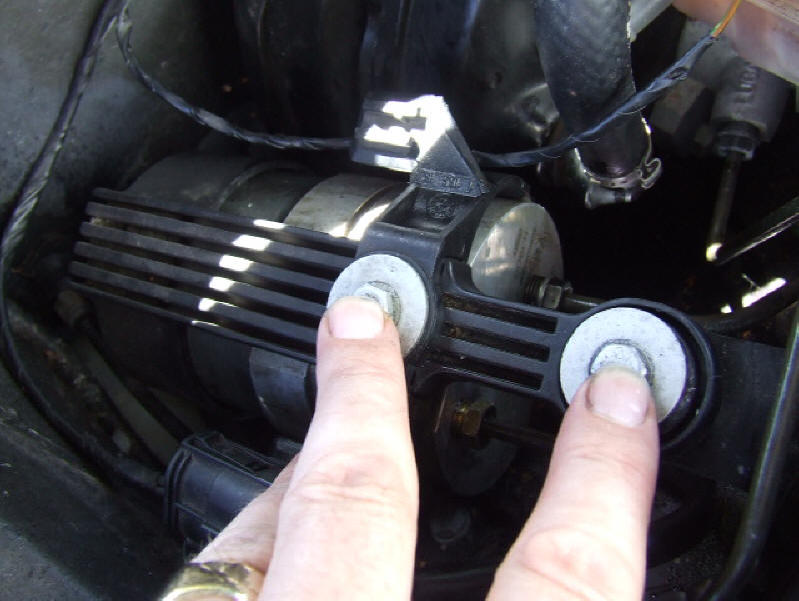
Under the forward bolt and washer there is a
metal sleeve and rubber mount, these have
to be removed. Use a little WD40 to lubricate
the rubber and lift the metal sleeve out, then
push the rubber mount downwards and
remove, it is quite a tight fit. The plastic
clamp can now be slid forwards and removed
by wiggling it past the hydraulic pipes and the
front mount:
The pump can now be pulled forward out of
the rear mount and removed, take care not
to bend the hydraulic pipes, however they
have a reasonable service-loop and can be
pushed out of the way.

Pump replacement and non-bleed method
Push the replacement pump into the mount,
re-fit the sliding clamp, replace the rubber
mount from under the front fixing and push
the metal sleeve back in. Refit both bolts and
washers. Refit the low-pressure hydraulic
fitting, do this quickly to minimise fluid loss:

Loosely screw in the high pressure fitting and
then unscrew by one full turn (very
important):

All done, time for a cup of tea.......
You will need a 12V source for the fluid
bleeding, I used a field battery and leads:
You can also run power from the cars 12V
supply, the pump takes quite a wad of current
to run. Here's how to bleed: Connect the
battery positive lead to RED on the pump
connector. Momentarily connect the negative
lead to BLACK, the pump will run and fluid
will squirt out around the high-pressure
connector. Disconnect and fully tighten the
high-pressure connector:
Now, the pump needs to be run backwards to remove air from the high-pressure hydraulic pipe. Connect the positive battery supply to the BLACK
connector pin and then momentarily connect the negative supply to the RED connector pin. The pump will now run in reverse and draw any air
from the high-pressure pipe into the reservoir. This completes the bleeding.
Prepare a strong solution of washing-up liquid and hot water and use a brush to remove all traces of brake fluid from the brake components and
metalwork. Brake fluid can damage paint so ensure it is all fully removed. Go out for a drive but check the brakes at slow speed first, as you pass
30MPH hold your breath and be pleased that the warning lights all stay OFF!

The E38's produced after 1997 can suffer
from ABS failure that bungs up fault lights for
ABS, ASC and Brake Warning, the lights are
all orange (warning) rather than red (failure).
This can be due to the failure of the Bosche
control unit that is strapped to the ABS pump.
The fault usually shows itself when the car
has got hot, all is OK one second, the next all
three lights glow orange and your ABS and
ASC will stop working. The fault only goes
away when the car has cooled down.
Another failure mode is that the lights only
come on when the speed hits around 30MPH,
or lower if the car is accelerated more
harshly. This may only happen rarely, but will
get more common as time goes on.
Diagnostics will show 'Error 92 pressure
sensor (pre charging pump)'. The repair for
this fault is shown later in this section. Firstly,
let's see the repair for the fault described in
the first paragraph:
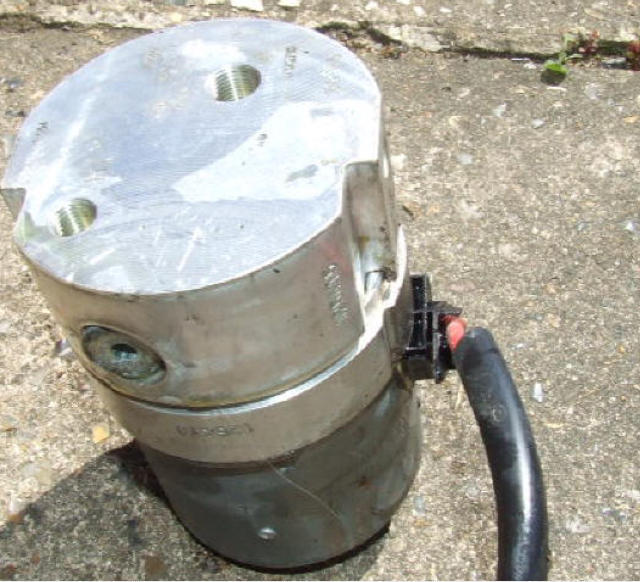
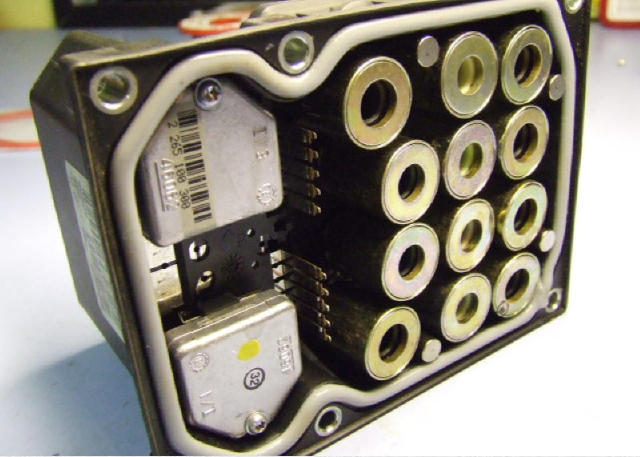
Although it may look like the 'black box' is
pretty simple with just a bunch of solenoids....
Timm’s BMW E38 and E39 ABS/DSC/ASC REPAIR
ABS, ASC and Brake Warning lights lit orange
SECTION 1 - DSC MODULE


SEARCH MEEKNET
SEARCH MEEKNET

...it isn't, and contains twin processors and valve-drivers constructed as a
hybrid circuit on a ceramic substrate. This clever stuff lives under the outer
cover and is covered by a soft compound that can be easily removed.
Repair of this circuit is impossible unless one of the gold wires has fallen
off, and even then it requires a lot of patience:
If you use CarSoft diagnostics you may get a 'wheel sensor failure' but you
will find that replacement of the wheel sensor makes no difference.
You really have two choices.....get a 'repair kit' from BMW (Part number
34526769862 - £450) which consists of the 'black box' and when fitted get
BMW to recode the ABS controller to match the car (another £30 - £50). Or
you can get a replacement from FAB or another breaker (usually £50
upwards and you get the ABS pump strapped to it).
If you get a replacement from a breaker it is essential that it comes from
the exact year and model as your car. As long as you can manage this you
will NOT need to have the unit recoded.
Even if you get the same part-number this does not mean that it will not
need recoding. The reason for this is that (for instance) a '98 735i uses an
ASC actuator whereas a '98 740i doesn't (being fly-by-wire). Both cars
have the same part number on the Bosch controller. If the 735i controller
was fitted to a 740i it will need recoding because the controller cannot 'find'
the missing ASC actuator.......CarSoft will return an 'ASC valve' failure.

So, enough blurb, this is how to sort it. Disconnect the battery otherwise you
will need CarSoft to reset any fault codes. Remove the pipe that leads to the
airfilter housing:
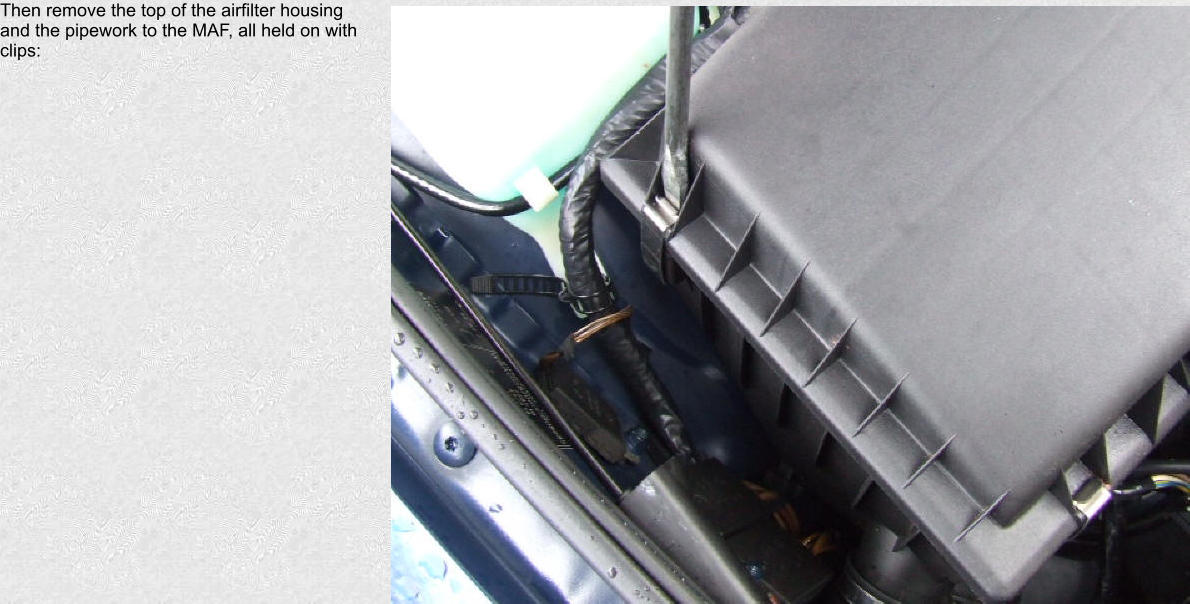
Then remove the top of the airfilter housing and the pipework to the MAF, all
held on with clips:

Stick a broad-bladed screwdriver in the end of the ABS connector and
carefully slide out the connector lock

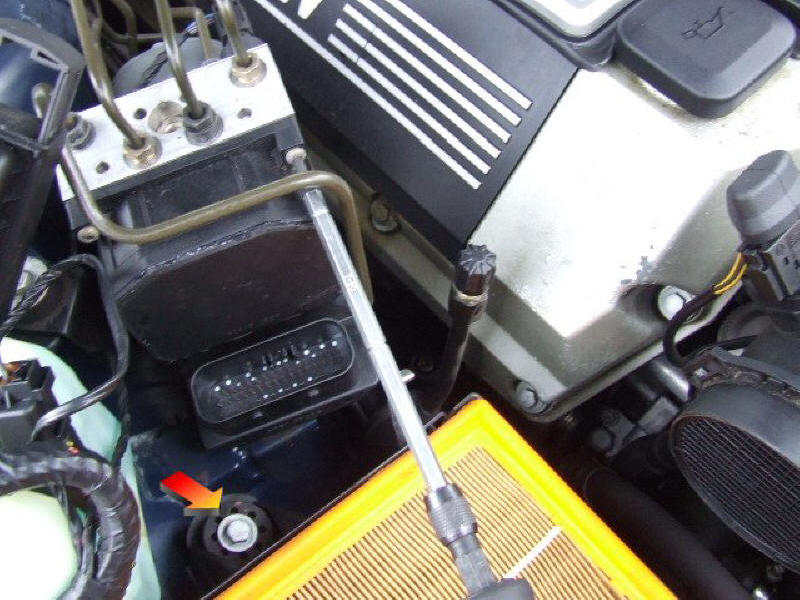
The connector can now be lifted out of the way. Use a Torx 20 driver to
remove the six Torx bolts that secure the controller to the ABS pump
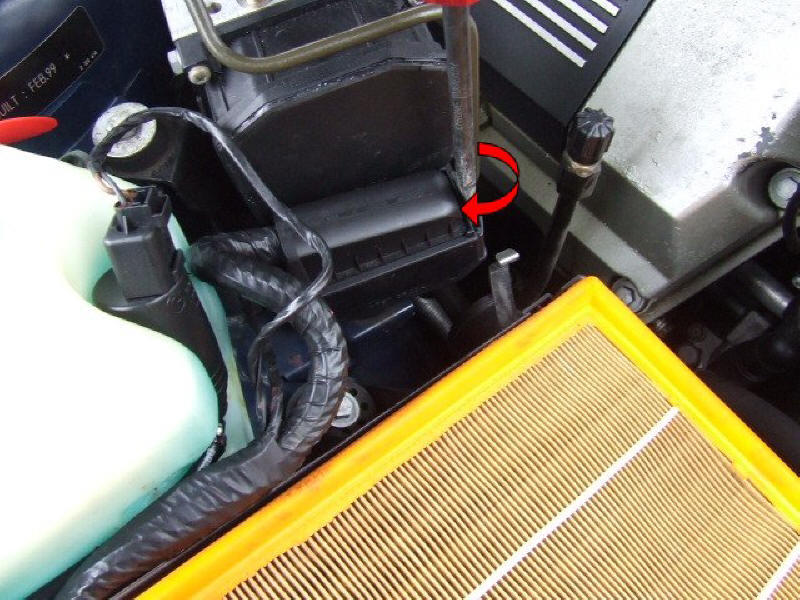
I found it quite easy to get to all six bolts as my driver was articulated, if you
do not have an articulated driver then remove the lower part of the filter
housing. The bolt marked above can be removed and a couple of jubilee
clips hold the lower housing to the large diameter pipework to get easier
access.
Once all six bolts are removed the controller can be pulled carefully away
from the pump:
...and replacement of the new part is just a reverse of this process. In the
picture above you can see that one of the brake pipes slightly interferes with
the controller, push this away from the controller when fitting the new
controller. Do not force the controller in place, you must align all the coils
with the valve bodies and then allow it to slide into position.
As long as the replacement part came from the correct car then there should
be no fault lights present. If you do get an ASC warning then the controller
will need recoding by BMW or someone who has the capabilities (CarSoft
cannot be used to recode).
SECTION 2 - Pre-Charge pump
failure
Pre-charge pump failure is suspected when the lights only come on when the
speed hits around 30MPH, or lower if the car is accelerated more harshly.
This may only happen rarely, but will get more common as time goes on.
Diagnostics will show 'Error 92 pressure sensor (pre charging pump)'.
The pre-charge pump lives right next to the brake master cylinder and is
used to increase the available brake fluid pressure which is used for the DSC
system to apply brakes to individual wheels. The pre-charge pump first runs
under the following conditions:
Speed greater than 30KPH
Engine speed greater than 2000RPM
Engine torque greater than 100NM
This means that if you accelerate very carefully you can stop the ABS, ASC
and Brake lights illuminating until a higher speed is reached. This is a good
indication (without the use of diagnostics) to ensure that the pre-charge
pump is the cause of the failure. To be sure the pump is at fault, you can
connect 12V to the in-line connector by disconnecting the connector pair and
applying 12V, positive to RED and negative to BLACK, with 12V connected
the pump should run. If it just goes 'bonk' (like mine did) it is dead as a Dodo.
Here's how to replace the pump without the need to bleed the complete
system. I normally take photo's as I do the repair, this time I couldn't as there
was a lot of brake-fluid around, so I will just point to things after the repair:
Start by disconnecting the connector pair, then remove these two long bolts
and washers:

There are two hydraulic pipes running to the pump, this pipe connects to
the fluid reservoir. Use an 11mm open-ended spanner and small metal
hammer to 'shock' the fitting loose. Quickly undo the fitting and then raise
the pipe above the reservoir to minimise fluid loss:
The other fitting is connected to the master cylinder, remove this using the
same method, not much fluid will be lost:
Under the forward bolt and washer there is a metal sleeve and rubber
mount, these have to be removed. Use a little WD40 to lubricate the rubber
and lift the metal sleeve out, then push the rubber mount downwards and
remove, it is quite a tight fit. The plastic clamp can now be slid forwards and
removed by wiggling it past the hydraulic pipes and the front mount:
The pump can now be pulled forward out of the rear mount and removed,
take care not to bend the hydraulic pipes, however they have a reasonable
service-loop and can be pushed out of the way.

Pump replacement and non-bleed method
Push the replacement pump into the mount, re-fit the sliding clamp, replace
the rubber mount from under the front fixing and push the metal sleeve
back in. Refit both bolts and washers. Refit the low-pressure hydraulic
fitting, do this quickly to minimise fluid loss:

Loosely screw in the high pressure fitting and then unscrew by one full turn
(very important):

All done, time for a cup of tea.......
You will need a 12V source for the fluid bleeding, I used a field battery and
leads:
You can also run power from the cars 12V supply, the pump takes quite a
wad of current to run. Here's how to bleed: Connect the battery positive
lead to RED on the pump connector. Momentarily connect the negative lead
to BLACK, the pump will run and fluid will squirt out around the high-
pressure connector. Disconnect and fully tighten the high-pressure
connector:
Now, the pump needs to be run backwards to remove air from the high-
pressure hydraulic pipe. Connect the positive battery supply to the BLACK
connector pin and then momentarily connect the negative supply to the
RED connector pin. The pump will now run in reverse and draw any air
from the high-pressure pipe into the reservoir. This completes the bleeding.
Prepare a strong solution of washing-up liquid and hot water and use a
brush to remove all traces of brake fluid from the brake components and
metalwork. Brake fluid can damage paint so ensure it is all fully removed.
Go out for a drive but check the brakes at slow speed first, as you pass
30MPH hold your breath and be pleased that the warning lights all stay
OFF!
The E38's produced after 1997 can suffer from ABS failure that bungs up
fault lights for ABS, ASC and Brake Warning, the lights are all orange
(warning) rather than red (failure). This can be due to the failure of the
Bosche control unit that is strapped to the ABS pump. The fault usually
shows itself when the car has got hot, all is OK one second, the next all
three lights glow orange and your ABS and ASC will stop working. The fault
only goes away when the car has cooled down.
Another failure mode is that the lights only come on when the speed hits
around 30MPH, or lower if the car is accelerated more harshly. This may
only happen rarely, but will get more common as time goes on. Diagnostics
will show 'Error 92 pressure sensor (pre charging pump)'. The repair for this
fault is shown later in this section. Firstly, let's see the repair for the fault
described in the first paragraph:
Although it may look like the 'black box' is pretty simple with just a bunch of
solenoids....
Timm’s BMW E38 and E39
ABS/DSC/ASC REPAIR
ABS, ASC and Brake Warning lights lit orange
SECTION 1 - DSC MODULE


SEARCH MEEKNET
SEARCH MEEKNET